Sunday, November 27, 2011

Plycraft chair restoration Part 4 and the last of this adventure...

With an almost half a day to try and finish up, I finally got back to the Plycraft chair that I've been working on. I knew I was facing a major challenge with the sides, but soon found that I had underestimated how much fabric I had for the project. Thankfully the fabric is busy enough that the pattern diffence doesn't show up too badly. Seriously, this was a bitch to recover the sides and try and keep somewhat straight along with trying to realign the sides back to their original positions.
But first the last pics of the base....

My obvious lack of talent is pretty obvious for a disciminating eye but still looks better than the holes that are left from abuse. Trust me, the pics look better than the results. Still working on getting better...
Mr. Mod and others that may have an interest, this is a butane heated flat blade that baiscally melts different lacquer based sticks of various colors and claritiy to fill gaps or chips in any type of problem areas. Needless to say, you need to search out a dealer in your particular home town as they don't sell these at yout local big box store...
OK, let's start wth the sides...Like I said, I was basically running on empty with the fabic and had to make due with the remainder I had left to work with after doing the seat and back. Could have sworn I had more than enough...
With another half yard of fabric I could have probabaly gotten a perfect match on both sides, but this will have to do. Considered going with another complimetary fabric for the sides but  I think this looks pretty good so far. Would have liked to get both sides perfectly aligned but the finished product looks pretty good! Chips look Ok although not my best work The leg was really too large of an area to just fill with this type of repair, but short of trying to cut a new piece, it was the best idea I could come up with.
Well for all of you that may be following along, here's the Plycraft shell chair restored to the best of my particular abilities. Don't think I'm quite ready to start working on someone elses chair, but this has been way fun and a major challnge.


I'm overall pretty happy with the end results and hope to get in our store soon. Not like it takes up a bunch of space and with any luck will go to a new home soon!
Price of materisls - $35 give or take..
Price of labor - 15-20 plus hours
Overall satifiaction with the experience and learnig something new - priceless
Hope to post again soon with the next fun projects!!
Feel free to comment if  you'd like, althought I do moderate posts prior to posting but try and get them up at least within a few hours. Thanks for taking a look as always!

Saturday, November 26, 2011

Plycraft shell chair restoration part 3

Had some time after work the last couple of days to work on the Plycraft and so far so good. Shell is pretty much done with a bit of help with my Mohawk butane burn in knife and lacquer burn in sticks. Not that I'm very proficient with this tool but it helps out filling minor chips in veneers. I've seen some professionals that use the oven heaters and thinner blades do the most amazing restoration but this particular model was made for the road gigs. This takes a great deal of experience to acheive the best results and what I'm not yet capable off...Practice makes perfect kind of thing...
Did manage to fill some of the worst spots on the chairs without screwing them up too badly though. I need to keep working on this as it comes in handy for a lot of projects.

I'll try and get some after pics up with the final post for this but, as you can see there are some areas that need to be addressed. Couple of final touch ups on the shell, but overall I'm pretty happy with the progress so far but I'm saving the finished shell pics for the final post. Also happy with how the base is coming along. Top cap may have been originally chromed but so badly rusted that a satin black works for the piece along with the top caps for the feet...
As far as the fabric goes, my wife, who is a big collecter of vintage fabric, shopped around for something that may work and then we dug through our rather extensive bins of fabrics and found one that I thought might be a good fit. Everything we searched was $40 plus a yard and hey, if you can find something out of yor own stash the price is right and I think it works fine for this chair.
Here's some pics of the "easiest" part of the recovering areas, the seat and back...
 fabric laid out, cut and hopefully ready to start...


Finished seat and back...this vintage linen MCM fabric was not an easy material to work with...
It shifts very easily and keeping everything lined up was more fun than expected... Still looks pretty good for the price.  I really wantedd to go with something of a more simple atomic print but must say I like this for this chair...Next post is the finsihed project and I expect the side panels to  be a real pain... Just hope I can get it right the first time and not have too many staples to repull...
Thanks for taking a look a following along...
Hope to get the final results out soon!!


Wednesday, November 23, 2011

Plycraft shell chair restoration part 2

I was really planning on waiting until I had a bit more to show but with Thanksgiving with the family tomorrow and having to work the store on Friday and Saturday and with the results so far, I just felt the need to get it out of my system. Won't have much time between now and Sunday to get much more accomplished.


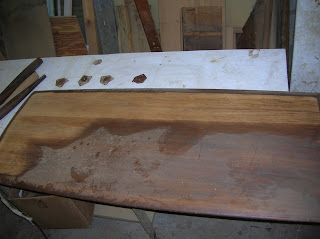
My trusty sander and I went after the shell today with suprisingly good results. As dried out and discolored as this looked originally I was happy with how it looked after going over with both 150 and 220 paper and even the base cleaned up nicely. I thought this may be more of a challenge working around the rivets in the base but it wasn't too bad and actually cleaned the rivets up as well. Needless to say I worked this very slowly and with "kid gloves" so as not to create any further veneer problems.
Not sure of the composition of the top layer of veneer. Its think it's either teak or walnut, but definitely a bit darker wood. That made the decision to use a golden oak stain easy. It always makes this tone of wood "pop" and I was smiling when I saw the results..)))


It appears just a bit darker in the pics than in person and a bit more glossy as this was taken right after I finished staining. That said the finished piece should have about the same shine as I plan on using a semi-gloss lacquer after the stain sets up and then using lacquer burn in for the missing chips of veneer. With a bit of luck this shell should look almost new with probably more than enough little issues that no one will mistake it as some kind of knock off. To say I'm satisfied with the results so far would be a serious understatement. Amazed would probably be a better word!! Just love how this chair was made and how well it's turning out so far. Now that I have a good idea of what the shell is going to look like it's time to go fabric hunting!
Forgot to post pics of the finished "hybrid" table on the last post and these shots really don't do it any kind of justice but you can get the general feel. Hey, at least the entire table is solid wood and very sturdy and turned out pretty well. Considering the pieces have been languishing in my garage for at least a year and came from different sources I'm happy with the end result.

Wish everyone a very Happy Thanksgiving and will post again some time next week!


Tuesday, November 22, 2011

Plycraft shell chair restoration Part 1...and away we go...

As promised, here's the first update on the Plycraft chair restoration. After looking at Mr. Modtomics recover of his Plycraft Eames style Mr. Chair (link to the sight on an earlier post) I figured well, how hard could this be...Well here's the initial teardown...


Well the seat and back were pretty easily removed just pulling the screws that held them on. The chair came to me minus only one of the original screws and maybe one of the dimpled washers under another. Obviously had been disassembled previously to recover the seat and someone had tacked a piece of non matching fabric to try and cover a rip in the top of the back. Why even go to the trouble if you're not going to replace? After this point the project went from, this could be fairly simple, to hmm, this may be a bit more complicated, to well this may end up being something totally outside my normal realm of expertise. As much as I love the challenge I'm now so totally glad I own this chair and it's not a job I took on for a customer for restoration. If I screw it up at least I don't have to explain what went wrong!


As you can see in the pics, although the outside panels are screwed down on the outside they are pulled and stapled inside the frame area. The outside panels have both plywood and foam on the underside and are looking quite complicated to try and rework back to original. Going to try and just replicate one at a time to be able to get this just right and will need reference for at least the first side.
First order of business is getting the shell back to some resemblence of original. This is turning out to be a very multifaceted project and a lot more than I had anticipated...
For those of you that have had the fun of trying to pull multiple staples with a screwdriver and pliers on any given piece you're working on I will offer this suggestion. This handy little tool will save you the money spent on the first project alone. Berrys staple remover for about $15 bucks and American made. Just don't put your hands in front of what you are working on as if it slips off it may cost you a trip to the walk-in clinic. Efficient, but non-descriminating on your flesh...


There are several areas that the veneer was lifting and missing some small chips here and there. Not too worried about the missing chips right now, but the lifting has to be addressed before refinishing which is going to set me back a day on the refinishing. Everything has to be solid before starting any project like this. Otherwise it will be more difficult and possibly death to the veneer if ignored. This is the current progress and hope to get started on working on the shell tomorrow. Don't plan on picking a fabric until the shell is up and running along with the base. Restain options are still in the air but considering a golden oak for starters and I can darken if needed. Always better to start lighter and work up as needed. If anyone has any experience restoring one of these I'd love your input. I'm always happy to share and receive any constructive input...


Sunday, November 20, 2011

Finished Heywood Wakefield M1585G cocktail, Plycraft swivel chair restoration and a hybrid MCM cocktail...

Not necessarily in order we have first the finished H/W 1585 cocktail table that I acquired sans the drawer. With the drawer closed you would never know it's not original and hopefully that's not a major turnoff to someone that loves the lines of this great piece.

I think it was worth the drawer rebuild even if it's not original. I'm going to price accordingly with a disclaimer but it still looks really nice!!
I was forced to dig deep into one side of my garage for some louvered doors for a display and unearthed a donated table top that a consignor at our store was kind enough to pass along. A separate donation of some tapered table legs inspired me to go ahead and get this project moving in the right direction. Like I don't have enough to do already... At a glance this looks like it may have been from a H/W cocktail but I think it's just a nice knockoff, but it appeared to be solid birch or at least a nice cut of wood regardless. I think the legs are ash, but again nice wood and very solid.

They didn't come to me together and it's obvious that the table top once had an apron all around and likely with bolt on legs. These pieces were certainly not candidates for a lighter finish as there was some embedded stain that just could not be addressed and I'm hoping for some success a bit darker. This is still going to be a very pretty table!


Last up a Plycraft chair that someone had sent me a request to take a look at. I'm pretty sure he retrieved it from going to the "big dumpster in the sky". Great save!! Thought not a donaton by any means, I went ahead and took off his hands for more than I'd would have liked and
I'm hoping for the best. I love restoring stuff and I hope I'm not in over my head on this particular piece. I'm for the most part a wood restoration person in the Heywood Wakefield vein, but I'll try my hand at anything I think I can save. I've worked on tons of danish and MCM stuff, but this was something new. Love a challenge!!


Seat cushion has been recovered at some point. Not exactly a professional job... Love the original fabric on the seats although it's way faded. The shell is very dried out and needs major attention. Still, it is an original Plycraft and the label is still intact under the seat. I'm guessing this will involve more than a post or two for the entire project. Structurally this chair is in good shape and very comforatable to sit in. Haven't seen one quite like it before and I'm already on the hunt for some farbic to compliment...I think some funky atomic print might be just the solution...
Post again soon...
A Modern Line


Monday, November 14, 2011

Lane tables finished...Saarinen dinette...and new H/W project...

As promised, here are the Lane Acclaim tables ready for a new home. Didn't have room immediately for them on our sales floor so I threw them up on CL to see if they'd get a bite there. Turned out very nice!!

Next up is the Saarinen designed dining set that a consignor had brought to us. No, it's neither a Knoll or a Burke set and the chevrons formed into the seats don't appear to be consistent with the original design. The bases are steel construction not the original aluminum and the bases are a bit heavier and not as slender but it's a nice vintage set nontheless. The set is in really great condition with just minor paint chipping on the bases and it's in my wifes store for a reasonable price.

Last but not least is my current project of a Heywood Wakefield M1585G cocktail table that we had picked up a long time ago that was missing the drawer. I'm not sure how you misplace a drawer for your table but that's how we purchased and needless to say, they weren't asking a ton of money for the piece. The rest of the table was in reasonably decent condition with just some surface scratching and no major structural damage. I considered just replacing the drawer front as another apron and eliminating the drawer altogether but hey, people need places to stash their remotes and other stuff so why not  fix it??

I love a challenge and building some type of functional drawer didn't seem too intimidating. Like I said, people like drawers and it might help sell the piece. Yes, I'm a packrat when it comes to saving anything that might be usefull and I had enough materials to put this together. Not that anyone would would mistake it for an original, but it's sturdy and functional and looks great if it's not open!
The birch facing was cannabilized out of an end (571) table that I had purchased many years ago that had been painted a chaurtruese green and appeared to be a good candidate for refinsihing but someone had recut the two "missing" back legs out of pressure treated limber. Hence the paint job! It's been reutilized for a couple of reconstuction jobs. Lesson learned about buying painted pieces! Still the wood was put to good use...The wood alone was worth the price I paid in the long term..very long term...Putting on the last coat tomorrow and hope to have finsihed pics up soon!
Thanks to all you MCM lovers and H/W people for taking a look. Post again soon!