Thursday, April 19, 2012

A Mid century mash up, and playing a little catch up on former posts...

I been quite busy lately, as always, and just found some time to get this in...
Here's a few finished projects and some new things I'm getting ready to tackle and if you are a bicycle enthusiast, there may be something here for you as well! Let's start with the bicycle...

A few weeks ago my wife acquired this particular piece of Americana from an antiques store somewhere out in the middle of the state. Yup, A 1962 Schwinn Deluxe American!


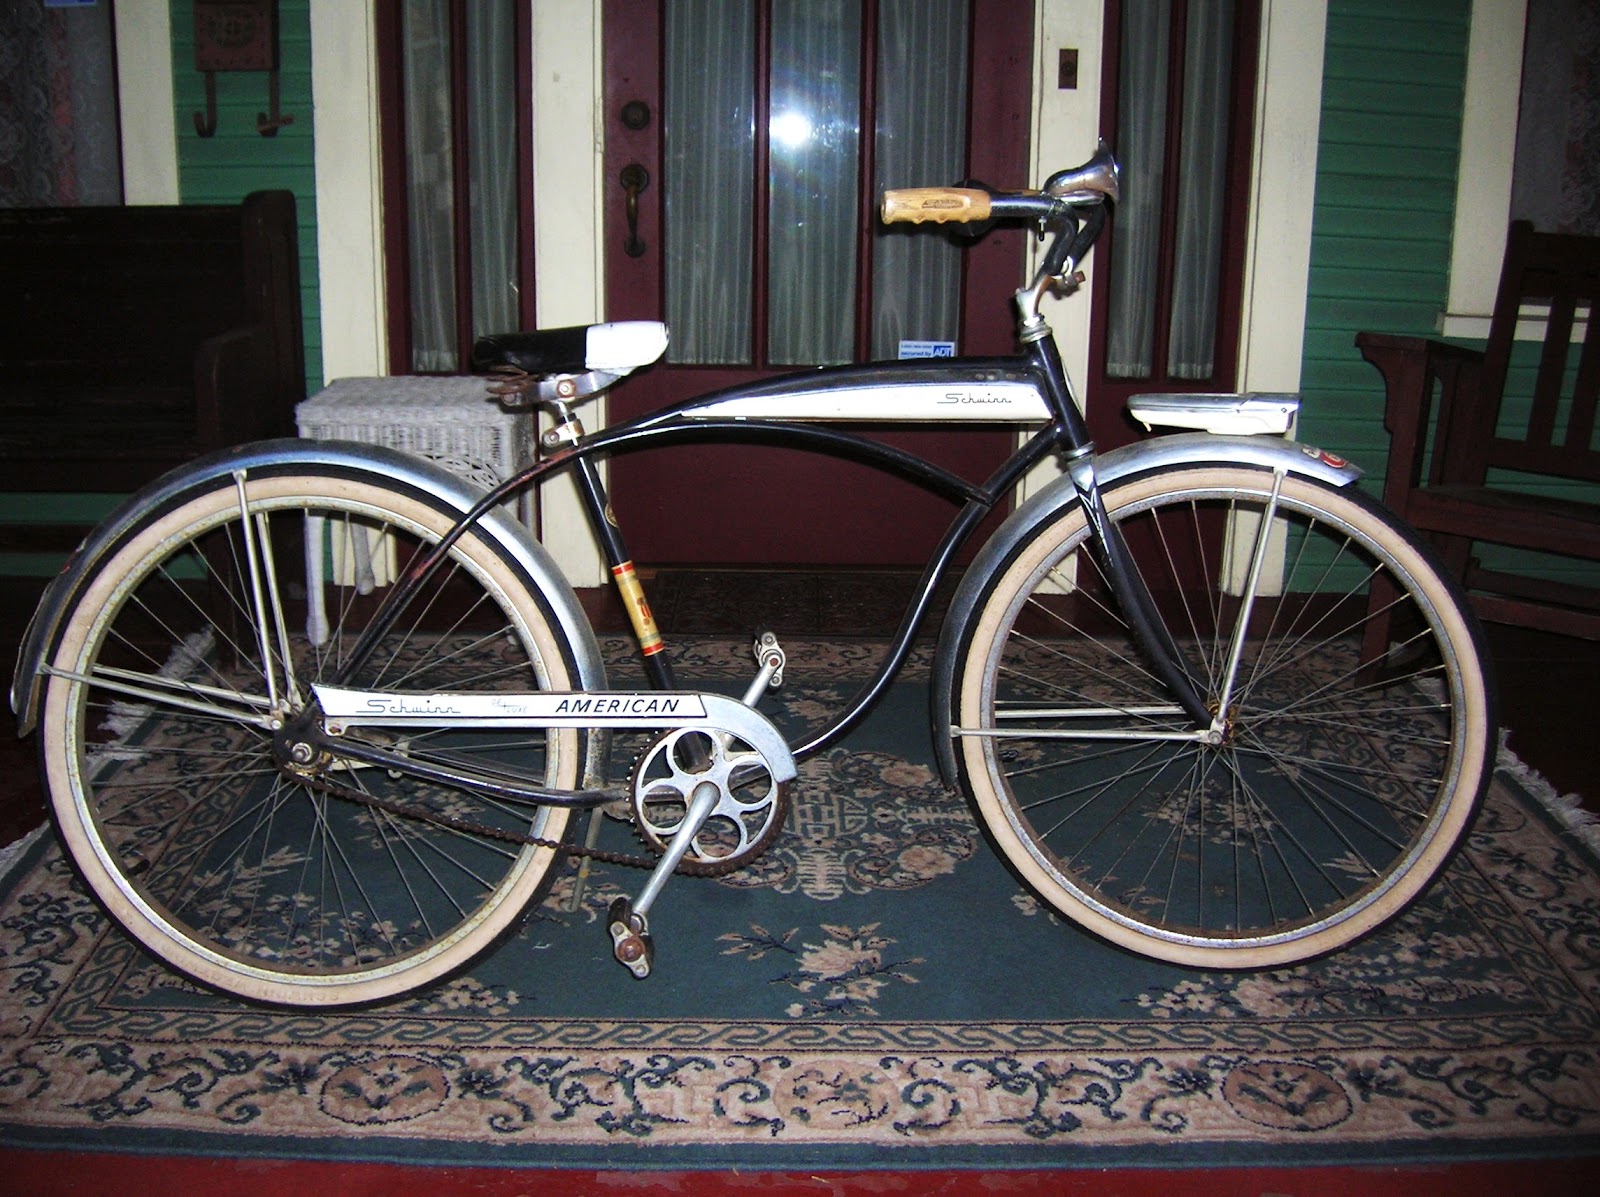
When I was growing up, Schwinns were the Cadillacs of bicycles. Only the most well off families had them in their stables. Some of my friends had them and I have to admit, I was a bit envious!
Coincidentaly, my wife is hosting a local swap meet for the bicycle lovers this weekend at her store and plans on displaying the bike there.
I recently refinished a desk top on a really nice mid century piece for one of my customers. The desk had a few other issues that needed attention. Loose legs, drawers starting to come apart, but it has a great look!


I love the floating top on this piece. The biggest problem was just use over time. Body oils tend to break down finishes in places and this is a prime example. I'm not going to bore you with the details, but I think I lost some sleep trying to get this right. Finally got it close enough so my customer was satisfied with the results. I'm still working on trying to get better results on the lighter finishes.


This is the same customer that has the really nice Mid-Mod apartment that I'd mentioned in my previous post. He was kind enough to let me take a few pics and although they by no means do his place justice, I think some of you may enjoy! His place needs the attention of a professional photographer:


R's place is mid-mod overload. What great taste! Should have gotten a better shot of the perspective cityscape, Manhattan? perfectly placed above the stairs when you turn around! Alexander Calder mobile? 


Baughman style sofa with Heywood Wakefield end tables topped off with Maurizio Tempestini "brush stroke" style lamps! Yes, they are the real deal. These are some of the most beautiful lamps ever made and my customer has a pair of them! I also love the taste in art! More to come...


Dining area sports sports a really nice vintage quality kind of small art deco buffet. Very nice piece! 


I think the dining set is a bit newer but looks great with his place!


Art for the dining space. Great choice!


Just had to include another shot of the Tempestini lamps. So beautiful!!


Great pebble art over the bed. Yes, I am a big fan of this...


If you don't already have a bar like this, I'm guessing you would love this one!


More great MCM art and a wind up clock that R had restored rather than going the replacement route. Good choice!


Ok, one more piece of swell art and we are out!
How much MCM fun can you fit into one apartment!  Thanks R. for letting me take the time to take some shots to share!

Last up is the assembled H/W table from the last post. Another satisfied customer and I will likely start on their chairs in the near future!


As always, thanks for taking a minute to see what's going on...
Next up...a mid century modern king size headboard/bedroom project that is sure to be challenging!!


Friday, April 13, 2012

Update on the M197 wishbone table and some other fun stuff...Le Corbusier anyone??

Here's an update on the Heywood Wakefield M197 table I'm in the process of refinishing:

There's a little tip that I probably should have mentioned earlier...Before you start the last sand on your table, wash your hands! The first couple of sands are not so critical, but you want your pieces ready to start and you don't want any hand oils on the wood beforehand! Keeping your hands clean between each step going forward is important!


The last 220 sand is complete and I've taken the time to put the drop leaves back in place to make sure they align correctly when finished. This can be critical for alignment, so take the time for this step! Whether for yourself or someone else, this is a sign of quality workmanship. I have a 22 gal. compressor with a blow gun nozzle attachment to remove the biggest part of the dust and debris before starting the finish. You can use a smaller compressor, but it's going to run non-stop. Even with the large tank I'm pretty sure my neighbors are glad to hear it shut down. I don't trust the chemicals in "tack" rags although I don't have a problem with pieces that I lacquer or urethane.

I always have people asking me what I use to refinish with. I've looked at some recipes that have been posted on-line and frankly, I haven't had the time to investigate making my own batches. I will share with you that I've purchased my finish on-line from a particular vendor for a number of years that you can find on E-bay. There are a couple of vendors out there that I personally haven't tried. If you look for "A Rainy Night in", yes that's my vendor. Very consistent over many years as far as a great match to original finishes. Enough said on that. I'm sure you can figure it out...
Ok, this is a wipe on varnish with toner in the mix. Not your normal refinishing job...


Here's one coat down with 3 to go. Clean white cotton or polycotton mix for the application rags is recommended. In the first coat you don't need to be too particlar. This is basically a seal coat. Most of what you are putting down is going to be absorbed by the wood. Just try and make sure you don't leave any drips or heavy areas that you need to resolve later and make sure try to cover all areas. Try and keep all your swipes across your piece after the first application with the grain of the piece and don't dwell on this. Hit it and leave it alone! You want to work relatively quickly and not keep going over an area again and again.
Drying times vary with temp and humidity. I normally let pieces dry about 12 hours and usually longer, but if you start early in the day and are blessed wth perfect conditions you may be able to get two coats down in one day. Make sure the pieces are completely dry before the next fun(?) step.

In this step you are going to need 0000 steel wool. Don't use anything coarser! Steel wool is another of the consumables, like clean white rags, that I go through like toilet paper and you are going to find out why in this step. My normal procedure is to take one the  rolls as it comes out of the package and rip it in half and stretch the half out a bit to make it a bit thinner.

You will notice that after the first coat is dry that you can feel pieces of dust and trash embedded in the finish no matter how careful you were trying to keep it perfectly clean. Your job is now to completely buff every inch of your pieces until you can no longer feel any garbage and the pieces are smooth.  When one piece of steel wool wears out just stack on other piece and keep going. There goes that compressor again!! Doesn't this guy ever quit??

You don't have to worry about hurting your pieces. You've got three more coats to go and each will be easier and cleaner than the last. Forget about trusting your eyes for this! Your hands are now your eyes for the duration of the job. Buffing out the imperfections after the first coat on a table like this usually takes me at least a couple of hours before applying the next coat. Same process is repeated for each coat. By the time you have the third coat on you should have very few problems with trash in the finish and it goes much faster and you want to go a lot easier with the steel wool.

Fast forward through to what your table should look like after the fourth coat:


I don't own the best camera ever made and the pics really don't do the nice depth and color of this wheat finish. Table is being reassembled tonight and J&B are picking up tomorrow! They have been very patient as this was supposed to be home before now. I'll put some assembled shots in the next post.

B of J&B sent me a pic of this very table as it appeared in circa 1966 with J's grandparents (table owners) his Mom and uncle:


Maybe we can get the new family around the table for an after pic when the chairs are completed!

For those of you who caught last weeks episode of Mad Men, you may have seen Roger Sterling napping in his Le Corbusior LC 4 chaise:


Coincidently we had a customer consign this nice Italian made LC4 and Eileen Grey E-1027 adjustable chrome and glass end table. Our consignors have some great taste!

I think the next post is going to take a look at one of my refinishing customers Mid-Mod apartment.
I'm sure you are going to love the pics, that he was kind enough to let me get, as much as I loved seeing his great taste!
As usual, thanks for taking a look...


Thursday, April 5, 2012

Give me the facts please, just the naked facts on how to proceed...

I know I've been remiss about posting for awhile and it's probably because, as usual I have too much going on at any given time. Trying to down size our storage area to a more cost effective smaller space has eaten up a few days. Yes, we/I did divest of quite a bit of "stuff" that I've found I will never get around to. Gotta pick your battles when it comes down to it!

Back to the wishbone table refinishing. I'm actually a little further along than this particular post, but here is how we are doing as of about a week or maybe a few days ago:


This is our first sanding of the really flat surfaces and just a dusting over of the edges with a 60 grit paper. Just enough to take off the original finish and start to work out any major imperfections. Stay away from "defined" break planes where it's obviously milled for a more dimensional edge with the 60 grit. You are not out to reshape your piece, just take the finish off. If you are leary of hurting your piece, you can just start with a 150 grit paper but you will spend a lot more time and sandpaper to remove the old finish.

OK, we've knocked off most of the original lacquer and the original toner and stain. I try and leave behind just a touch of some of the original finish on the above step, as it makes the next go round a bit easier! On to the nest sanding...


How we look down to the 150 grit sandpaper. This is a critical sand as you still don't want to reshape the line of the piece, but still want to resolve any issues with difficult areas. Heavily stained spots may need more attention, but try not to dig too deep with the sander. Especially in areas that need to aline. Although H/W factories did not spend a great deal of time and trouble to finish the underside of these tables, I feel compelled to at least give them a once over. Especially any areas that can be visible when the drop leaves are dropped, so spent at least a little time working these over when you do the 150 sand. 
This particular table had no major issues as far as stain removal and so far has been relativally simple.
If you are working with tables like this, it's best to slide the table back together to get an overall level when you are finishing, so one side isn't inadvertantly higher of lower when put back together. Same with the drop leaves.

The last sand will be with a 220 sandpaper and laying out the pieces to start the actual new "clothes". Yeah, this might be a bit boring for some of you, but the real attraction is how this beauty is going to look when done!

I'll post again soon when we start getting ready to "clothe" our leggy beauty, so stay tuned.
As always, thanks for taking the time to take a look...